

Microsoft Outlook has a feature known as Automatic Replies (Out of Office). This feature enables Outlook users to automatically respond to emails when they’re out of the office, regardless of their computer is on or off.
If you’re using an Exchange server or Office 365 for business, it’s easy to send automatic (Out of Office) replies from Outlook whenever you want to let people who send you email know that you won’t be responding to their messages right away.
Note: This feature is only available with an Exchange account that is used by many organizations.
How to Set Up “Out Of Office” Replies on All Outlook Versions
Below is the step-by-step process to set up “Out of office,” replies in Outlook 2003, 2007, 2010, 2013, and 2016.
Setup Automatic Replies on Microsoft Outlook 2003
1. First, navigate over to the Tools menu and click on Out of Office Assistant, as depicted below.
2. In the Out of Office Assistant dialog box, click on I am currently Out of the Office.

3. Here, in the AutoReply, only once to each sender with the following text box, type the message you want to send while you are out of the office. Depending on who usually sends you emails, you should keep this message short, professional, and to the point. For added comfort to your senders, add your usual hours of availability so that they can figure out when they should expect a reply!

4. Click on the OK button. This will save your changes and activate the message you entered in Step 3.

5. The Out of Office Assistant will continue to run until you repeat step 1 and select the “I am currently in the Office” option.
Set up Out Of Office Replies for Outlook 2007
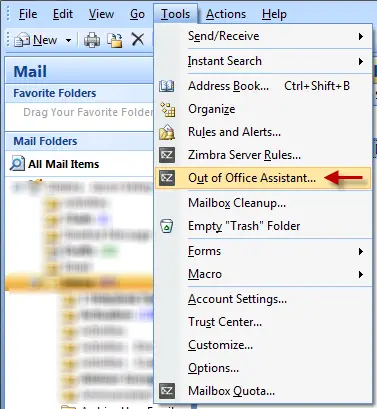
1. Go to the Tools menu and click Out of Office Assistant.
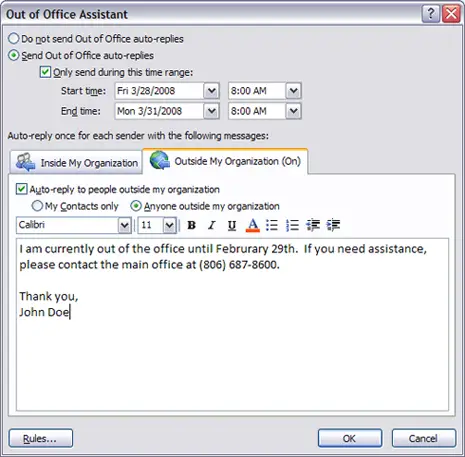
2. In the Out of Office Assistant dialog box, select the Send Out of Office auto-replies check box.

3. If you want to specify a set time and date range, select the Only send during this time range check box. Then set the Start time, and then set the End time. If you do not specify a start and end time, auto-replies will be sent until you click Do not send Out of Office auto-replies.

4. In the Inside My Organization tab, type the message you want to send within your organization. In the Outside My Organization tab, type the message you want to send outside your organization. This is a great feature because it lets you come off as more formal in certain situations. Sometimes, personal and company emails shouldn’t be responded to in the same way!

5. Click on the OK button.
6. If you selected the “Only send during this time range” option in step 3, the Out of Office Assistant feature will continue to run until the date and time set for the End Time in step 4 is reached.
Otherwise, the Out of Office Assistant will continue to run until you repeat step 1 and select the “Do not send Out of Office auto-replies” option.
Set it up For Microsoft Office Outlook 2019, 2016, 2013, and 2010
1. Click on the File tab, and then click the Info tab in the menu.


2. Click Automatic Replies (Out of Office).
3. In the Automatic Replies dialogue box, select the Send Automatic Replies check box.
4. If you want to specify a set time and date range, select the Only send during this time range check box. Then set the Start time, and then set the End time.
5. In the Inside My Organization tab, type the message you want to send within your organization. In the Outside My Organization tab, type the message you want to send outside your organization.

6. Click, OK.
7. If you selected the “Only send during this time range” option in step 4, the Automatic Replies (Out of Office)feature will continue to run until the date and time set for the End Time in step 5 is reached.
Otherwise, the Automatic Replies (Out of Office) will continue to run until you repeat step 1 and select the “Do not send automatic replies” option.
How To Turn OFF Automatic Replies
Sometimes, things change and you might not need to enable automatic replies anymore. If you want to turn off the feature, it’s simple!
Here’s how to do it:
1. Choose File> Automatic Replies.
2. In the Automatic Replies box, choose Do not send automatic replies.
This is the setup procedure for “Out Of Office” replies for Microsoft 2003, 2007, 2010, 2013, and 2016. If you face any issues while following any of the above methods, let us know in the below comments. We will help you to solve the issues.
It can be a good idea to turn off automatic replies or change the message if you are transitioning to larger business hours or a new job. However, we recommend that you keep it on as long as you’re working!
It’s the best way to let people know why you aren’t responding immediately and give them a better idea of when you can reply back to them.
You can also choose to filter important emails so that you can respond to them outside of your regular hours! Sometimes, they just can’t wait.
Conclusion
This was an extensive tutorial on how to set up Out of Office replies on all versions of Outlook—from 2003 to 2019. We’ll continue to update this article as new versions of Outlook inevitably come around.
So, we hope that this article helped you figure out how to send automatic replies to emails while you’re out of the office!
If you have any questions or concerns, you can let us know in the comments below. We’d be happy to walk you through any parts of this list upon request.
Thanks for reading!
Did you find the above methods useful?
What is your signature Out of Office message?


