

Looking for ways to transfer photos from an iPhone to a PC?
In this article, you will learn how to transfer photos from your iPhone to your computer. This step-by-step guide will show you how to import images to both Windows PC and Mac.
But before we go into details, I find this short video very helpful. Please watch the first 60-seconds of this video. You will learn how to transfer pictures and videos from your Windows PC to your iOS devices like iPhone, iPad, and iPod touch with this quick and easy tutorial video. If you don’t want to watch the video, you can read on.
Let’s get it started!
The Apple iPhone is a popular and exceptional device for its slender design and unique user experience. It is evident that using an iPhone camera, one can capture images with outstanding picture quality. It is excellent to take pictures with the iPhone because of its superb camera performance. As the image’s quality improves, the resolution will climb that eventually needs more storage space on your device. In such a situation, you might want to know how to transfer photos from iPhone to PC.
Usually, people who love photography and own an iPhone come across such a situation. However, there’s no real need to fuss. There are many ways to quickly and easily back up your smartphone photos to your PC or the cloud, which not only saves you storage space but ensures your photos will be promptly accessible elsewhere in the event your phone is stolen or crashes.
Transfer Data from PC to iPhone with or without Using iTunes

In this article, I will be explaining 5 different ways of transferring photos from an iPhone to a PC/laptop to help you quickly find what best fits you. Below are a few methods for moving images from iPhone to PC/Laptop, whether you want to depend on a direct connection or one of many cloud-based apps. Check it out!
A Step-by-Step Guide on How to Transfer Photos from an iPhone to PC in 5 Steps
Here are the five different ways to move or import all your photos from your iPhone to a computer or laptop. You can transfer photos from iPhone to PC using iTunes, iCloud, Windows, and many other ways.
1. Upload your photos using a USB cable
Basically, the process for importing and transferring photos from an iOS device hasn’t changed for a decade, regardless of whether you’re using a Mac OS X or Windows-based machine. The process varies slightly between ecosystems and operating systems, but it’s typically a matter of plugging in your iPhone and clicking the Import button, or some version thereof. Look how simple it is:
Mac OS X — Yosemite or later
Step 1. Initially, plug your phone into your computer, either using a 30-pin USB cord or Lightning cable, the same way you would do so if you were uploading music.

Step 2. The Photos app should automatically launch. If it doesn’t launch automatically, open the program via Launchpad or your main Applications folder. Alternatively, launch Aperture or iPhoto.
Step 3. If using Photos, click the Import New button in the upper-right corner, or select the individual photos you want to transfer before clicking the Import Selected button at the top.
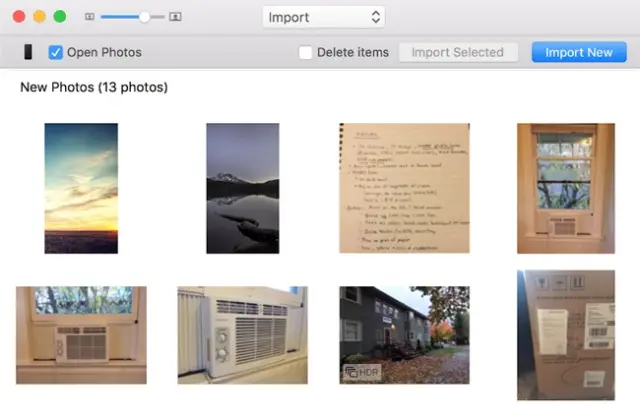
Step 4. If you wish to delete the photos automatically on your iPhone after importing, you can also check the box beside Delete items.
Step 5. Once done, pick Albums from the drop-down menu at the top of Photos, and open Last Import to view your recently-uploaded images. Remember that double-clicking an image will also bring up additional options for sharing, favoriting, and editing said images.
NOTE:
- OS X, by default, launches the Photos app whenever a camera, memory card, or device containing photos such as USB drives is connected.
- To disable this, after the first time Photos launches, uncheck the box at the top-left that says “Open photos for this device” or “Open photos.”
2. Transfer Photos From iPhone to PC using iTunes
If you’re using a Windows PC, you can easily sync your iPhone’s photos with iTunes on your computer. If you have multiple albums on your iPhone, it is recommended to place the individual folders into a single larger folder. You can have any number of subfolders in this folder that you wish to sync with your iPhone. This is because you can individually select which subfolders you want in iTunes.
Things Needed:
- Phone
- USB cable
- A PC to plug in the device
- iTunes
- iTunes account
Here is a detailed step-by-step procedure to transfer photos from your iPhone to PC using iTunes. Check it out:
Step 1. First of all, organize your photos on your iPhone in order.
Step 2. Plug in your iPhone to a PC via the USB cable and open iTunes.
Step 3. Find the iPhone icon from the menu and hit the Photos tab under settings on the left side of your screen.

Step 4. Check the box to “Sync Photos” and Select “Choose folder” from the drop-down menu.
Step 5. Browse to the desired folder and choose the folder you’d like to sync.
Step 6. Just hit the Apply button to start transferring your photos.
3. Transfer Photos from iPhone to PC Via iCloud
This is another method where you can transfer or import your photos from your iPhone to your laptop using iCloud. You can use the Apple iCloud service to sync photos from your iPhone.
Things Needed:
- iPhone
- USB cable
- A PC to plug the device
- iCloud
- Wi-Fi
Step 1. Firstly, enable iCloud on your iPhone from Settings and turn on Photo Stream.
Step 2. Download the iCloud Control Panel onto your computer or laptop.
Step 3. If you’re connected to Wi-Fi, all photos that you take with your iPhone will be saved directly to your PC within seconds.

Step 4. If you’re not connected to Wi-Fi, when you take the pictures they will be synced to your computer next time you have a Wi-Fi connection.
Note: iCloud won’t transfer videos recorded with your iPhone and is unable to sync photos taken before iCloud is on.
4. Transfer Photos from iPhone to PC Using Data Transfer Tool
You can even transfer your photos from your iPhone to your PC using a tool called TunesGo. It is one of the best iPhone transfer tools for newbie users who are bored by troublesome processes to transfer files. It is a pretty handy tool that helps you manage your iPhone or iPad/iPod like a piece of cake.
Using the data transfer tool is relatively better than iTunes for its simple operation, speed, and fluent responding. Furthermore, it embeds with a video conversion tool that helps convert Apple unsupported video/audio format to the right formats for seamless enjoyment.
Compatible Devices
Fully compatible with iOS 9, iPhone SE, iPhone 6s, iPhone 6s Plus.
Note: It is an expensive software, but it is worthy of money for its stability, 30 days money back guarantee service and free updates.
Step 1. First of all, open iPhone/iPad/iPod transfer tool.
Step 2. Plug in your iPhone to the computer and run iPhone/iPad/iPod transfer tool.
Step 3. Now, click the Photos button in the left directory to bring up the photo window.
Step 4. Check iPhone photos and click Export to in order to export them to any location on your PC or laptop.
Step 5. Once the transfer completes just hit the “OK” button.
Get TunesGo for Windows
Get TunesGo for Mac
5. Transfer Photos from iPhone to Windows PC (8, 8.1, 10)
As Mac OS X is a product of Apple, it is pretty simple to pair an iPhone with it. However, that doesn’t mean Apple hasn’t made it challenging for Windows users to access their photos using a program belonging to their particular OS. The process is almost identical for Windows 8 and 10 users, though, so you shouldn’t experience much difficulty using any recent Windows OS. Here are the simple steps to import or transfer photos from Apple iPhone to Windows PC (8, 8.1, 10). Check it out!
Step 1. First, plug your phone into your Windows PC, either using a USB cord or Lightning cable, the same way you would do so if you were uploading music.
Step 2. The Photos app launches automatically, but if not, open the program using the Windows Start menu or search bar.
Step 3. Hit the Import button in the upper-right corner, represented by a box with a downward arrow inside. Later, check the individual photos you wish to transfer from your Apple iPhone and click Continue in the bottom left.

Step 4. You will then get a pop-up window wherein it asks you whether to delete imported items from your Apple iPhone after importing. If you wish to delete them, just tick the check box.
Step 5. Now, click the Import button to transfer the images to the main Pictures folder on your PC. Alternatively, click the grey Change link to select a new save destination.

Step 6. When finished, simply click the Albums button accessible via the left-hand navigational pane. Then, select Last Import at the top to view, share, or edit any of your recently uploaded photos.
These are the five different ways to transfer or import your Apple iPhone photos to your computer or laptop. Hope these methods help you to transfer or import your Apple iPhone photos to your computer or laptop.
Do you use your PC as storage for your iPhone photos?


