
Social Media platforms play a major role in our day-to-day lives. These platforms have changed the way we interact and communicate. It is so easy to make friends, get to know people, share anything, chat, post pictures, etc. Few people keep scrolling down their newsfeed to entertain themselves. No doubt, these social media platforms are a kind of addiction and waste a lot of our valuable time.
Spending too much time on social media platforms can affect our studies and productivity. People even go to the stage of getting rid of these platforms like Facebook, Instagram, Twitter, etc. Then, you are at the right place to get rid of such platforms. It is good to give yourself some rest from all these Social networking sites. So, here’s a simple tutorial to deactivate or delete your Facebook, Gmail, Twitter and Instagram account for permanent or temporary.
There are two options for getting rid of these social media sites. They are by Deleting or by Deactivating the account. If you delete your account, you won’t ever be able to reactivate or retrieve any of the content or information you’ve added. So, it’s better to Deactivate your account for few days. Make sure you know what you are doing before proceeding.
Tips And Tricks To Get Genuine Followers In Facebook, Twitter, Google+
The procedure to deactivate the account in different social media sites is different from each other.
Steps To Deactivate Your Facebook Account:
If you deactivate your account your profile won’t be visible to other people on Facebook and people won’t be able to search for you. Some information, such as messages you sent to friends, may still be visible to others.
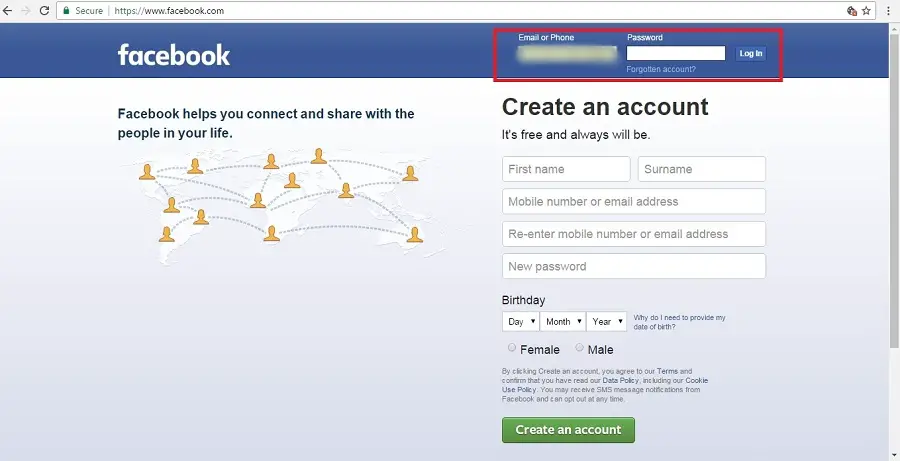
Step 1:
Log in to your Facebook account.
Step 2:
Click on the down arrow icon present at the top right corner of the main window.

Step 3:
Click on the Settings button and click on Security tab.


Step 4:
In the Security Settings, you can see an option called ‘Deactivate Your Account‘ in the bottom of the page.
 Step 5:
Now, a pop-up appears ‘Deactivate Your Account‘.
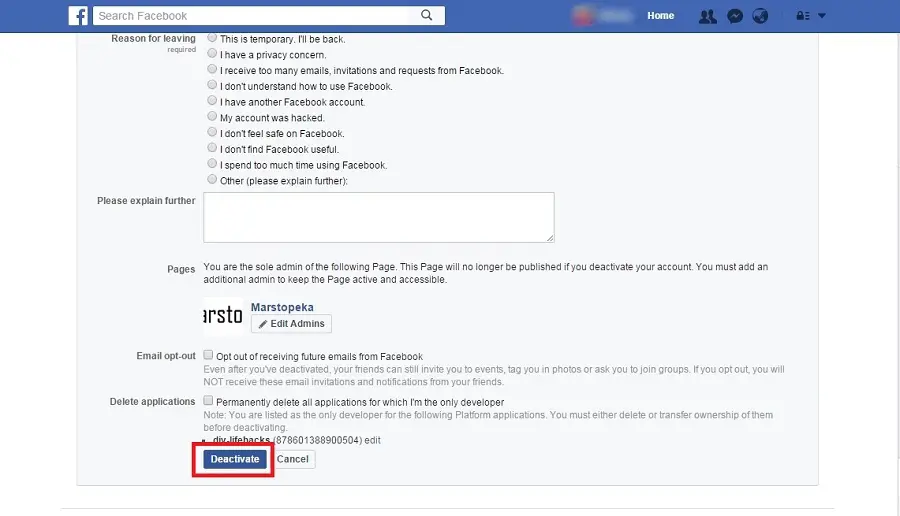
Step 6:
Facebook will show you some inputs to be filled such as the reason for leaving, pages, Email opt out and so on. So, just fill those things and click the Deactivate button.

Step 7:
That’s it. You have now successfully Deactivated Your Facebook Account.
If you’d like to come back to Facebook anytime after you’ve deactivated your account, you can reactivate your account by logging in with your email and password. Your profile will be restored in its entirety (ex: friends, photos, and interests). Remember that you’ll need to have access to the login email address for your account to reactivate it.
Steps To DELETE Your Gmail Account:
In Gmail, we aren’t provided with the option of Deactivating and Activating the account.
Step 1:
Sign-in to your Gmail account.

Step 2:
Click the “Gear” or “Profile Pic” icon in the top right of your Gmail homepage.

Step 3:
Click on ‘My Account‘ button.

Step 4:
Now, on the left side of the new window of settings, select”Delete your account or service”.


Step 5:
It will ask you to enter the password as for security. So, enter your password and hit enter. That’s it. Your Gmail account will no longer be activated.
Steps To Deactivate Your Twitter Account:
Step 1:
Login to your Twitter account.

Step 2:
Now go to the account settings by clicking on the egg icon or on your profile picture icon on the top right corner.

Step 3:
There appears a drop-down list in which you have to click the Settings button.

Step 4:
In the new window appeared, click on Account on the left side of the window.

Step 5:
In the content of account page, just scroll down to the bottom. There you will see a button called Deactivate My Account. Click on it.

Step 6:
Now you will be provided with a confirmation page to confirm that you really want to deactivate your twitter account. Click on the deactivate button.

Now your Twitter Account is Deactivated. You may reactivate your account at any time until 30 Days from the date of deactivation by logging in. After 30 days, Twitter will begin the process of deleting your account from their systems, which can take up to a week, as provided in their Privacy Policy.
Steps To Deactivate Your Instagram Account:
Step 1:
First, Login to your Instagram account.

Step 2:
Click on User Icon Button in the top right and then select Edit Profile.
![]()

Step 3:
Now, scroll down the page and at the bottom, you will see an option called “Temporarily disable my account“. Click on it.

Step 4:
Select an option from the drop-down menu next to Why are you disabling your account?and re-enter your password. The option to disable your account will only appear after you’ve selected a reason from the menu.

Step 6:
Click Temporarily Disable Account.
Your Instagram Account is now disabled till you want to reuse it.
Hope you like the article and if there are any doubts related to this article then please don’t hesitate to discuss that with us in the comments section below.


