

If you own a Mac computer, you could immensely benefit from knowing how to use its multiple desktops feature. Especially if you work on your Mac, it can save you time and better help you organize your workflow.
In this tutorial, we will show you how to use multiple Mac desktops for more space and better organization. But first, let’s take a look at

Why Do I Need More Desktops?
Like all laptops, Air Pro, MacBook, and all other similar devices have limited screen spaces. It works for most users but some need to plug in an extra screen to increase the workspace. However, not everyone has the resources to procure a new screen. This is where the trick of adding more desktops comes in.
The benefits of multiple desktops are:
Multiple Tasks
With multiple desktops, users essentially have multiple workstations that share the same engine. You can assign one screen for a particular task and a second for another. For example, users can designate one desktop for coding, and programming and the second one for testing and documentation.
Furthermore, you can also delegate applications on different desktops to make work smoother and easier. For example, you can assign one desktop for editing and the second one for testing. You would not have to minimize or quit the editing software to ensure checking the output. It would not just be convenient but also improve productivity and efficiency.
Organized Screens
Usually, users have one screen where all the applications are available and it can be a bit messy. You would use the same screen for communication via email and as a workstation. Having to minimize the screen to open another program can be a nuisance. However, with multiple desktops, you can assign one type of application to each desktop.
Hence, you would essentially have two computers, one to get the work done and the other to communicate with clients via email and other documentation. This would be a delight for people who do not want to stuff their screens with applications. When the applications are divided into multiple desktops, the screen gives an overall minimalist and clean look.
Do Multiple Desktops Slow Down The Mac?
Using an external screen often slows down the computer because the GPU has to work twice as much. However, with multiple desktops there is no such issue because the GPU does not have to work harder. Furthermore, the CPU and RAM on most MAC are powerful enough to support multiple desktops without slowing it down.
That said, the system can slow down based on applications that you might use on different desktops. And it would not be because of multiple desktops but because of the power consumption of those particular applications. In simple words, even if there are not multiple desktops and users open multiple heavy-duty applications simultaneously, it would slow the system down.
How to Use Multiple Desktops on Mac in 6 Easy Steps
Here is a step-by-step process to use multiple desktops on your MacBook Pro or Air:
- Google Backup and Sync is now available for Mac – Here is How it works?
Step 1: Create your first desktop
To create and work with more than one Mac desktop, the first thing you need to do is access Mission Control from the F3 key or through System Preferences > Mission Control. Next, you will see the macOS Spaces bar at the top of the screen, where you’ll find thumbnails that represent different desktops, as well as any programs that are running in full screen or Split View.
To add a new desktop to your Mac, click the + icon in the upper right corner and you’ll see a new thumbnail displayed. If you only have one desktop and aren’t running apps on full screen, its default name will be Desktop 2.
- How to Install Public Beta of iOS 11, macOS High Sierra, and tvOS 11 on iOS devices
Step 2: Assign a different background for easier identification
To work more comfortably with several desktops on Mac and know at a glance which one you are on, it is best to assign a different background image to each of the desktops you use.
To do this, go to the new desktop by clicking on the corresponding thumbnail. Then, go to System Preferences > Desktop and Screen Saver. Now, select any photo you would like to use for the new background. You have the possibility to choose a solid color, a scenic photo, or a photo from your own album!
Step 3: Navigate between the desktops with a swipe
Now that you have multiple desktops opened on your Mac, it’s important that you learn to move quickly between them to make better use of your work time.
Apart from Mission Control, you have other quick ways to move between spaces. One of them is with the trackpad or the magic mouse. In the first case, slide three or four fingers to the left or to the right, depending on the direction in which the desired desktop is located. In the case of the magic mouse, use only two fingers to perform the same movement.
- iSkysoft PDF Editor Pro for Mac – How to Guide
You can move between spaces quickly with the keyboard. Press the Control key + the left or right arrow key and you will be transported from one desktop to another with ease.

Step 4: Transfer windows and folders between desktops
If you want to reassign a window or a folder from one desktop to another, we have different formulas for doing this. One of the simplest operations is to press F3 to open Mission Control and drag the window to your desired desktop. You can also do this by holding down the mouse on the window and touching the Control key + the left or right arrow.
- Steps To Remove Password from PDF Files Windows, Mac
In the case of folders, to ensure that they move without problems, make sure that the ordering of the desktop is not automatic. To do this, click with the mouse on the space and select Sort by > Nothing.

Step 5: Assign applications to desktops
When you open an app, you have the possibility to assign it to a specific desktop using the quick menu. The quick menu is displayed by clicking the Dock icon with the right mouse button. Then, place the cursor over the Options heading and select the specific space in the Assign To section.
Furthermore, you can also drag the applications from one desktop to the other. In order to do that, hover the pointer over the application window and wait for the blue border to be highlighted. Drag the window and drop it on the desktop where you want to use it.
You can also use the touch bar to grab the window and use Control + Arrow keys to move the application from one desktop to another.
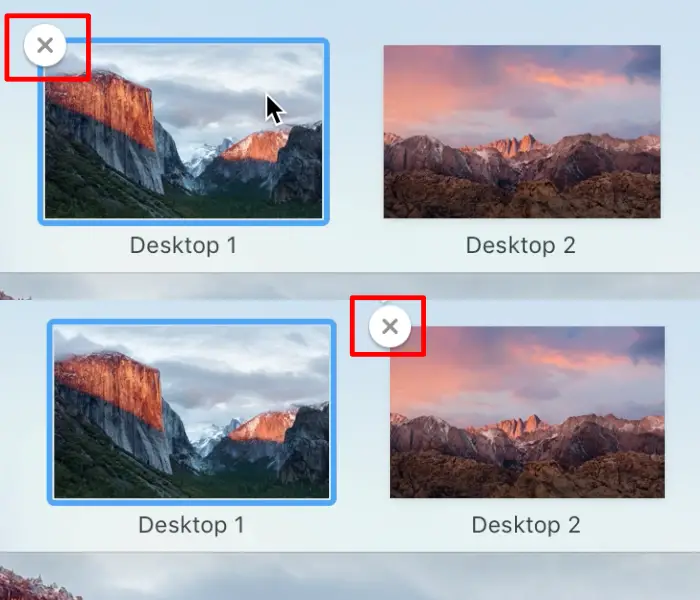
Step 6: Remove desktops when you’re done using them
In case you’re no longer using one of the desktops you’ve created, removing it is an easy thing to do. Open the Spaces bar with the F3 key, place the mouse cursor over the desktop you’d like to delete, and you should see that an X appears in the upper left corner of the desktop. Click on it, and the selected space will be erased.
So, this is how to use multiple desktops on your MacBook Air or MacBook Pro. I hope this article helps you to use your Mac more efficiently!
Advanced Tips For Working With Mission Control
Multiple desktops make the work convenient but there are a few tips that can make things even easier. You would be able to navigate between different applications in milliseconds. Let’s take a look at them.
Create Keyboard Shortcuts For Different Desktops
We have discussed methods to switch between desktops earlier but none of them are as simple as a shortcut. With this method, users can access their desired desktop with just a click of a button. In order to do that
- Open the System Preferences and head to the Keyboard.
- You would get a shortcut tab.
- Click on Mission Control and check to which function a particular shortcut corresponds. Assign the shortcuts to different desktops.
- Now just type that shortcut and the desired desktop would appear right up.
Turn Off Automatic Space Rearrangement
Desktops rearrange themselves based on the recent use which can be a nuisance. Desktop 4 would become Desktop 2 without notification and permission. This can be confusing but there is a solution to it. You can turn off the Rearrangement setting from the mission control. To do that:
- Open system preferences and head to mission control.
- You would see an option “Automatically rearrange spaces based on recent use”. Uncheck it.
Moving on, users that have multiple screens might also want to check “Displays have separate spaces”. It would give you independent sets of desktops for each screen. Users can have 32 desktops in a dual-monitor setup and each would have its own menu bar. Furthermore, on a single screen users can create up to 16 desktops.
Use App Expose & Show Desktop
App Expose clears all the clutter from the desktop and reveals all the open app windows of any given app on multiple desktops. In simple words, if you chose Google Chrome, all the windows that are opened on multiple desktops would appear on the screen. This can help in closing down applications on multiple desktops at once. In order to do that pressing Control + Down Arrow. Open the desired window by clicking on it.
Furthermore, Show Desktop also comes in handy that lets you peek at multiple desktops without closing the windows. It pushes the open windows towards the edge of the screen to let the users know what applications are available on different desktops.
Run Clean ups
While using multiple desktops, users often leave applications open and forget to close them. It can clutter the RAM and slow down the system. Hence, users should run clean-up applications at least once a week to clear redundant files and close unwanted applications.
Use Spotless
Desktops are cluttered with unnecessary document files and screenshots. We leave them as such because it is harder to organize them in a folder. But Spotless is an application that offers a solution to it. You have to open the spotless and click on all the files that you want to organize. Drop them in spotless and it would organize them in folders automatically.
If you have any questions regarding any of the above steps, let us know through the comments. We will get back to you to solve all your Q’s as soon as possible!
How many desktops do you use in your Mac for maximum productivity?
___________________________________________________________________________
Some other articles you might find of interest:
What Gaming PC should you get for under $1,000?
The Top 18 Best Prebuilt Gaming PCs Under $1000 Revealed & Reviewed
Have you ever wondered what the internet of the future looks like?
Can you have two phones with the same number?
Your Quick Guide on How to Use the Same Mobile Number on Two Phones


