
Video editing is undeniably one of the most in-demand and relevant skills needed in this information era. Transitions, special effects, photos, and clips – these special elements make up a masterpiece most of us love to watch.
Video is rapidly being used as a primary means of communication. Being able to communicate confidently via video-based platforms will become increasingly important as remote working becomes more common.
The ability to edit video allows you to arrange and rearrange video clips to produce a unified picture. You’ll need a mix of technical and soft abilities to edit videos well. Video editing abilities can be put to use in a variety of vocations, especially in the field of arts and humanities.
Indeed, video editing will open you to a variety of career options. Freelancing video editing jobs exist, and many companies are turning to video to sell their products in the digital era.
There are wide ranges of software for Mac users to use in editing and producing engaging videos. This video editing software can be installed for free. But in case the editing project requires some professional features, Mac users can already secure it for an affordable price.
In this article, we’ll share with you the features of top editing software you can safely install on your Mac, namely Filmora Video, iMovie, and Final Cut Pro. Make sure to bookmark the steps and analyze which you can best use in your requirements.
How to Edit Videos on Mac with Filmora Video Editor
Wondershare Filmora is one of the best video editors you can install and use on your Mac. With its unique animation features and manageable process that can cater to all levels of video editors, Wondershare Filmora can be availed for an affordable price.
What’s more, to love about it is its compatibility with more types of operating systems. It can be installed in MacOS 12 or later as well as in Windows. It also provides a survey to its users to identify their need for using the software. Certainly, knowing these features would help Filmora’s team to personalize and improve their service.
To start working on a new project, install Filmora and double-click on its icon on the desktop. The software’s welcome screen will appear on the screen asking you to create a new project. Similar to other video editing software, you can also select the frame rate, resolution, and aspect ratio of the project to save time in editing.
How to Import video
Once you have completed the required information on the title and video settings of your project, you will be routed to the video editing dashboard. To import photos and videos, click on Media in the upper right corner of the screen.

Then, once the dialog box appears, navigate to the folder where your photos/videos are located. Filmora also offers preset videos you can use especially for event/theme-based videos such as sports or weddings.
If you are going to work on a large video, you can also drop down the import menu to check other import options. One of those is the import with Instant Cutter Tool which is designed to help you trim your video as fast as possible.
How to Edit Video
After importing the photos/videos you need for your project, enhance it by using Filmora’s free effects. Its classic motion graphics, mosaic, overlays, and more features can boost the quality of your projects for sure.
Filmora also comes with a library of transitions, elements, title templates, and sound effects perfect for intense and branding videos.

How to Export video
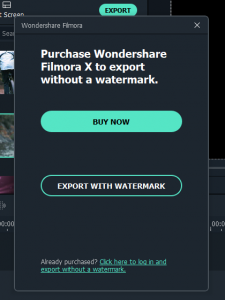
Once you have finalized your video, export it by clicking the export button on the upper right of the effect dashboard. You will be prompted with a dialog box reminding you that your video will have Filmora’s watermark in case you download it using the free version. Nevertheless, you can buy the pro version to export the video without the watermark.
In either case, you can upload the video directly to YouTube and other online video channels. This is a handy option for social media managers or vloggers. However, in case you are going to use the video for events, you can save your project on a USB device or directly on your computer.
How to Edit A Video on Mac with iMovie
To launch iMovie, click the iMovie icon on the desktop or on the tab. This is how the iMovie icon looks:

You can also open Launchpad, search for the iMovie and click it. Once iMovie opens, follow the following steps in creating a new project.
How to Create a new project
Step 1: Choose File and you will see an information tab labeled New Project. You can also press cmd+N. Rename New Project with your preferred project name.
Then, select your preferred aspect ratio and frame rate from the dropdown menu. Once finalized, click create.
iMovie also features built-in transitions and titles that you can choose from or something that can relate to your project. Each theme also has that automatically applied to your project. You can also manually add transitions and titles by deselecting Automatically Add Transitions and Titles.
Once you have finalized your name, frame rate, and theme, you can now click ‘create’.
How to Import video
To import your photos and videos, click on the video cam button on the middle left part of the dashboard and wait for the folder to open. Then select the photos and/or videos you want to import and use for the project.
How to Edit Video
Edit videos in iMovie by clicking on the editing toolbar and plotting their features on the specific part of the video, as shown in the playhead. You can also review the results of your editing by looking at the platform’s monitor.
Aside from transition effects, you can also spice your video by creating a mood for your video by adding special effects such as flash or fade. Adding background music will also please your audience especially if you are creating an upbeat or sentimental project. You can import music from your computer’s library, or add it from the built-in sound effects.
How to Export video
Once you have finalized all the editing, you can now publish your project and export it in your desired format. To export your project, click on File and select ‘share’. A dialog box on the right will appear and provide you with different options for exporting.
Choosing The Right Software
With so many video editing software available and online video editors choosing the right one for your need or business can be quite tricky. You need to read up on reviews, check out user feedback, and see if you will be able to incorporate this program into your workflow. Sites like Truely, which compare products and collect reviews can be quite beneficial.
Conclusion
With these video editing tools along with their easy-to-use features, you can step up your game in producing quality videos. If these tools have helped you in your project, or if have more video editing software that you think can be best to add to the list, send us an email at alltop9.com.


