
Hello Bloggers!!! Today I am going to tell you about the Domain transfer from One Godaddy Account to Another Godaddy Account with easy steps. Sometimes we may buy Domains from different Email ID as per the offers or may any other reason. And it is very difficult to remember all the passwords right. Hence, we bring up all the domains to our main Email ID which is associated with all the main domain names for our convenience. We have a direct link of Godaddy domain transfer, but it is not allowed for few domains. The method which I am going to show you today helps you to transfer almost all the domains. To know the procedure just follow the steps below.

Transferring a Domain Name from your Godaddy Account
Transfer Domain from one Godaddy Account to Another Godaddy Account steps are as follows.
Let us assume that, we are transferring the Domain from “Account A” to “Account B“.
Step – 1
First step is to Login to an “Account A” Godaddy Account. Here, we are transferring the domain from Account A to Account B. So, first you need to login to an Account from which you want to transfer the domain.
Step – 2
After signing into your account, Click on “My Account” and you can see the drop down, there click on “Visit My Account“.

Step – 3
You will see your account page. There, next to the Domains Click on the “Manage” (Domain Control Center). See the image as follows.

Step – 5
You will see all the Domains in your account along with the Domain you want to transfer. Here, select the domain name you want to transfer.
Note: If you want to transfer one you can select only 1 or if you want to transfer more than one then select all the domain names which you want to move or transfer.

Step – 6
Select “More” which is on the top of the menu bar, you can see the drop down. There select “Begin Account Change“. See the image below for the clear info.

Step – 7
Enter the Email Address of the “Account B” to which you want to transfer the domain. After filling the Email ID scroll down to fill all the details.
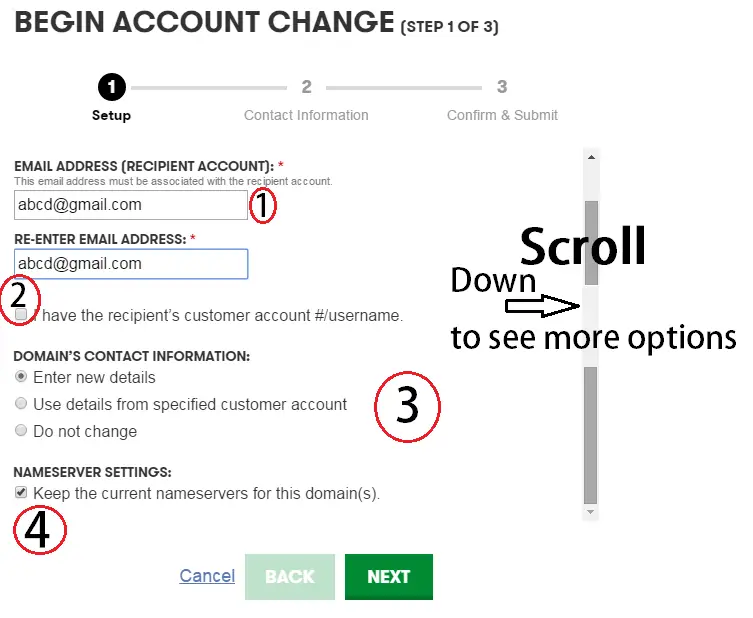
In the above image there are few details you need to fill out.
- Enter the Email ID of the other Godaddy Account, to where you want to transfer the Domain name.
- If you know the Customer number #Username of the other account “Account B” then mark the box and Enter the Customer number of other number.
 Note: If you do not know the new registrant’s login information, leave this field blank, and then select Enter new details at 3
 - In Domain’s contact information, select one of the following:
Note: The new registrant’s Customer # or login name might be required or optional depending on what you select here. For Enter new details, it is optional. For all other options, it is required. If entered, the value must match information on file in the receiving account.===> Enter new details: Enter contact information for the new registrant.
===> Use details from specified customer account: Use contact information from the account you entered. (This will not work until the specified customer has setup their settings page to include all necessary information.)
===>Do not change: Retain the contact information currently assigned to the domain name you are moving.
Note: If moving a country-code top-level domain name (ccTLD), you might have to select this option and have the new registrant contact our support department to update the contact information. For more information, see About ccTLDs (Country-Code Domain Names). - Select Keep the current nameservers for this domain to retain the current nameservers for the domain name. If you do not select this option, we park the domain name when the new registrant activates it in the new account.
Note: The domain name loses any custom DNS when it moves to the new account.
Step – 8
After filling all the details Click NEXT.

Step – 9
If you selected Enter new details in step 7 then complete the following, and then click Next:
- Organization (Optional): The organization with which the new registrant is affiliated, if any
- I certify that the specified organization (Optional): Indicates you agree that the organization will be the legal registrant
- First name and Last name: The new registrant’s first and last name
- Address 1 and 2: The new registrant’s street address
- Country : The country in which the new registrant resides
- City, State, Postal Code: The new registrant’s city, state, and ZIP code
- Phone: The new registrant’s phone number
- Fax (Optional): The new registrant’s fax number
Note: We display a list of the services that we will cancel after you move the domain name from your account. You cannot reverse a cancellation after you agree to the move. There will be a 10-day transfer lock after the domain is moved into a new account.
Step – 10
Select I have read and agree to the Domain Name Change
Note: When you change the Organization or the First name or the Last name (in the absence of an Organization entry), you must agree to a 60-day lockdown to continue. If you have a .au domain name, a 60-day lock will not apply.
Step – 11
If you want to transfer your domain name during the 60-day period, you should decline the Change of
Registrant and transfer your domain name before updating the Organization, First name, or Last name fields. Otherwise, select I understand that, if I want to transfer this domain.
Step – 12
After filling all the details, Click on Finish.
That’s all the process of transferring or moving the domain from Account A, i.e., the account from which you want to transfer the domain.
This process will take minimum 10-15 minutes to update your other account regarding receiving of the domain from the first account.
Accepting the Domain into the other Account -B account or the other account
Transferring of the domain is done with the above process. Now, to receive the domain into the new account you need to accept it from the account where the domain is sent to. That is Account B, according to this article assumption. Follow the steps to accept the domain into your Godaddy account.
Step – 1
Login to the Account – B Godaddy Account to accept the domain.
Step – 2
As usual, Click on ” My Account” shown on the top of your Godaddy Account and you will see the drop down. Click on “Visit My Account”
Step – 3
Next to the Domains Click on Manage
Step – 4
From the Domains menu, click Pending Account Changes, and then click Incoming Account Changes.
Note: After the account change is complete, the domain(s) will not be able to be transferred for 10 days.
Step – 5
Complete the action by one of the following
- If the domain name displays in the list : Select the domain name, and then click Accept.
- If the domain name does not display in the list: Click Accept Emailed Changes, enter the following, click Next, and then proceed through checkout of the free transaction
- Transaction ID: The identification code from the email we sent you.
- Security Code : The security code from the email we sent you.
It may take a few minutes for your domain name to appear in your account. To view the domain, hover over the Domains tab and click All Domains.
That’s all Folks! All is done perfectly and now you can transfer any domain from any account. If you face any problems while transferring your domain, let me know through your comments. I will help you with the same.
