
Many of us use Gmail for different purposes. Mostly, it is used for official purposes to send information to a particular person or an organization.
List of the 12 Best Gmail Tips And Tricks You Can Use Gmail Like a Pro
Nowadays, even a 12+ student is having a Gmail Account. So, we are well aware of Gmail. You may think that you know every tip and trick in the Gmail. But, there is a set of Gmail features that you may not know.
Although not all of the Gmail features are available straightforward, so you need a few guidelines to use Gmail like a Pro. So, we have dug out some interesting features and accessing them is very simple.
Without further ado, let’s get you productive with these 12 Gmail tips and tricks:
1. Authentication Icon For Verified Senders:
Spammers can spoof a message to make it look like it’s sent by a real website or company that you might trust. To help protect you from such messages, Google tries to verify the real sender using email authentication. As an additional security measure, you can enable the “Authentication icon for verified senders” lab.
![]()
When this feature is enabled, it will display a special key icon next to emails you receive from websites such as eBay, Amazon, and PayPal that phishers often try to use to obtain users’ passwords and credit card information. If you don’t see or find the key icon from an email, then it is not actually from the original company and it is likely a scam.
Enable the lab:
- On your computer, open Gmail.
- In the top right, click Settings.
- Click Settings > Labs.
- In the “Authentication icon for verified senders” section, select Enable.
- At the bottom of the page, click Save Changes.
2. Undo Send:
This feature gives the option to take back the message or email that you have sent so you don’t do something that you regret. People who write emails hastily and emotionally, this feature is for you.
First, Turn-On Undo Send:
- Open Gmail, in the top right, click Settings and then Settings.
- In the “Undo Send” section, check the box next to “Enable Undo Send.”
- In the “Send cancellation period” section, set the amount of time you want to decide if you want to un-send an email.
- At the bottom of the page, click Save Changes.
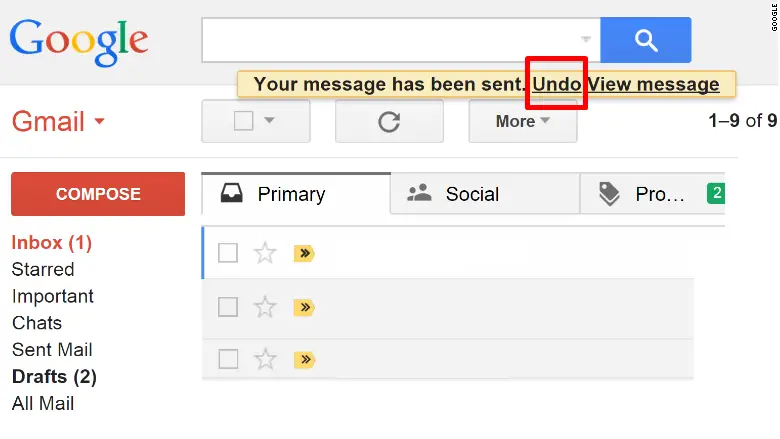
Undo sending your message:
After you turn on Undo Send, you can cancel sending an email.
- After you send a message, you’ll see the message “Your message has been sent” and the option to Undo or View message.
- Click Undo.
Top 15 Incredible Notepad Tricks, Hacks and Commands That You Must Give a Try
3. Canned Responses:
If you need to send similar email responses out to a number of people, consider using a Google Lab feature called “Canned Responses.” This feature allows you to save an email as a canned response and use it over and over again without needing to copy and paste into a new window.

Enable Canned Responses:
- Click on the gear icon in the upper-right corner of your Gmail.
- Go to “Settings”, Click on the “Labs” tab.
- Go to “Search for a lab,” and type Canned Responses in the search bar.
- When you find it, Press the “Enable” button and tap on Save.
Create A Canned Response:
Next time, when you want to send the same email to a number of people, then you have to follow these steps.
- After composing the email, you have to click the arrow next to the trash icon on the bottom right of the Compose window.
- Select “Canned response”, on the menu that opens then click “New canned response” on the submenu.
- Call it something that will help you remember when to use your canned response, such as “email invitation” or “thank you for coming.”
- Next time, whenever you want to send the same response to anyone, click on this Canned Response and the reply you want to send.
Deactivate/Delete Facebook, Gmail, Twitter And Instagram Accounts
4. Right-Side Chat:
Making your Google experience more consistent between products, more contacts in your chat roster can be displayed and it is much easier to access and use when it is tucked away in the bottom-left of the Gmail interface.

Enable Right Side Chat:
- Open up your Gmail inbox and hit the cogwheel drop-down menu and click on “Settings”.
- Select the “Lab” tab and scroll down until you see the “right-side chat” lab. Alternatively, you can type in “right-side” in the conveniently-placed search box and that should bring up the relevant result.
- Click the “Enable” radio button and don’t forget to save changes.
Best And Useful Internet hacks you should know
5. Use Gmail Keyboard Shortcuts:
You can use keyboard shortcuts to navigate your inbox and messages, format text, and complete actions like archiving and deleting. To see a complete list of keyboard shortcuts, including which need to be turned on, type Shift+? and you will see all the shortcuts on the screen. You can memorise shortcuts of the functions you frequently use from this list.

Turn-On Keyboard Shortcuts:
Some keyboard shortcuts only work if you’ve turned them on.
Note: Keyboard shortcuts aren’t supported on all keyboards.
- Open Gmail, in the top right, click Settings.
- Again Click Settings.
- Scroll down to the “Keyboard shortcuts” section and Select Keyboard shortcuts on.
- At the bottom of the page, click Save Changes.
Advanced Gmail 2-Step Verification Settings for better Security by Google
6. Quick Links:
Quick Links can be found in the same place as Chat, directly below the label list. It’s a great place to store all of the emails, searches and settings links that you visit on a daily basis. For example, you use filters often and need to adjust them on daily basis. Getting to filters requires a few clicks, but if you make a Quick Link, you can instantly access your filters right from your Gmail inbox.

The Quick Links feature makes easy to find anything by adding a box in the left-hand column “that gives you 1-click access to any bookmarkable URL in Gmail.”
Enable Quick Links:
- Click the settings tab in the gear icon in the right-hand corner of your Gmail inbox.
- Click on Labs tab, scroll down and find the Quick Links Lab. Click on Enable.
- Click Save Changes at the bottom of the page.
How To Add Quick Link:
- Navigate to the page you want to create a Quick Link for.
- Now click on the Quick Links Lab in the bottom left-hand corner.
- In the Quick Link area in your left-hand panel, select Add Quick Link.
- You will then be prompted to create a label for that Quick Link.
- Save the name and your Quick Link is ready to go!
15 Amazing Tricks About Internet, I bet you don’t know these
7. Send Email From Another Account:
If you have multiple Gmail accounts, you don’t need to log-in from each account to send emails. Just add them to your main account and start sending emails.

Add Another Account To Your Main Account:
- To add an account, go to “Settings” from the menu with the gear icon, and then go to “Accounts and Import” tab.
- Here, click on the “Add another email” button under “Send mail as” heading, and complete the verification process.
- Once verified, you should see an option to choose another email while composing the message.
8. Track Gmail Emails:
If you want to track when your sent email is read or how many times it is read, you can use Sidekick extension for Chrome. Just set it up in Chrome, and you will start receiving notifications when an email is read.
Get Started:
To get started with Sidekick, you need to create a free account here. You can log in using your Google account, which is a convenient sign-up process. After that install Sidekick Chrome extension from here.

From the Sidekick dashboard, you need to give access to your Gmail account (Don’t worry about account security. Once you have configured your email service, after that Sidekick will keep tracking which emails are opened & which emails remain unopened. It also let you track if the links in the emails are clicked or not.
9. Access Big Emails:
This may come as a surprise, but Google is known for its search capabilities and offers many useful search shortcuts. It’s no wonder that Gmail does the same. If you are low on your free Google drive space and thinking of removing some long emails to free up space, you can easily do so with an advanced search.
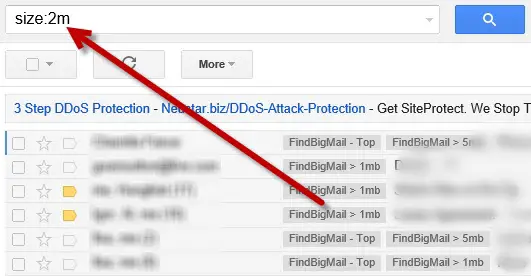
Just type “size:(X)m” in the search bar and you will see all emails bigger than the specified size. Here “(X)” is the size of the emails you want to find, replace it with a number like “size:5m”.
10. Do A Smarter Search:
When Google launched Gmail they revolutionised emailing. Until then, the focus of email clients and services had been on sorting emails. Google is a search engine. Consequently, Google’s email service provides many different ways to search your Gmail emails, while sorting is neglected.

Searching for emails with a keyword is good, but did you know you can do an advanced search to pinpoint your search? For example, you can use “has: attachment” keyword to find all the emails with attachments, or “after: 2015/08/07” to find all emails that came after 2015/08/07. You can get all these advanced search terms from Google Support page.
*Tips And Tricks To Get Genuine Followers In Facebook, Twitter, Google+
11. Batch Unsubscribe:
If you are tired of all the offers and posts dropping in your inbox, you can unsubscribe from them. However, finding all the un-required subscription emails and unsubscribing can be a bit hectic.
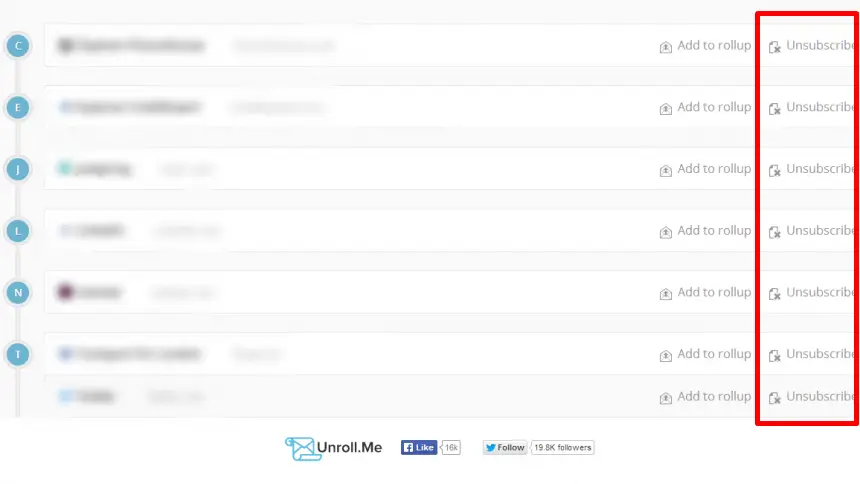
Then, Unroll.Me will help find all the subscriptions and opt out from them with a single click. All you have to do is log in to your Gmail account and allow access to your data. Unroll.Me will neatly show all the subscribed emails, and you can easily unsubscribe.
12. Use HTML Version Of Gmail:
There are two types of displays that Gmail has. One is “Standard View” that we all use. Another one is the “Basic HTML View”. Depending on whether your browser works with Gmail, you might see one view or the other. If you’re using a browser that works with Gmail, you’ll see Gmail in “Standard View”. When you’re in Standard view, you can use all of Gmail’s features.

If you have a slow connection and Gmail takes too much time to load/navigate, you have to change your view to “Basic HTML View”. When you’re in Basic HTML view, you won’t see some Gmail features like: Chat, Spell checker, Keyboard shortcuts, Adding or importing contacts, Custom “from” addresses, and Rich formatting.
These are the best Gmail tips and hacks to use it like a pro. If you have anyother tricks, share them with our users in the below comments.

