

Hello, readers! Today I am going to clear all your doubts about receiving payments from your Google Adsense account to your Bank account.
Google AdSense is one of the most widespread monetization techniques used by all bloggers. It is a plug-and-play advertising network it is truly essential to have a piece of pretty much knowledge on this topic so that you could get the complete benefit of the opportunity it proffers generating lump sum earnings via your blog. Many bloggers have some uncertainties regarding the payment transfer to your bank account.
So, I thought of explaining to you the process of receiving the Google Adsense payment to your Bank account.
It is a common question that impels every newbie blogger mind of getting payments from Google AdSense. If you’re looking for the process of receiving payment from Google Adsense then, you’ve landed in the right place. In order to receive Google AdSense payment directly to your bank account, you need to get through the FOUR steps. Check out the detailed steps mentioned below and get your doubts clarified.
Take a Look! If you don’t have an AdSense account yet and looking to apply one for you.
Then there is a clear step-by-step guide to applying for Google AdSense.

Steps to Complete Before Receiving Google AdSense Payments to Bank Account
- Filing your Tax information
- Providing Payee name, Address, and PIN verification
- Select the mode of payment
- Threshold Payment
Filing Your Tax Information
Tax information is not required for all the locations. Depending on your location, the Tax information page will be enabled for you to submit information accordingly. If the page is not popped up in your account then you need no file any tax information.

If in case, the Tax information is enabled in your account just check out the process given below to submit the form.
- Log into your Google AdSense account.
- Go to Settings and select Payments.
- Select the payee profile which can be seen on the left sidebar of your account.
- Just click on Update Tax information.
- That’s all! You are done with Tax information.

Payee name, Address, and PIN Verification
This is a very crucial step where you have to be very cautious before entering your information.
- Payee Name: Enter the payee name exactly which is same as on your Bank account. Don’t guess something and enter the wrong one. Better to keep your bank passbook near you and fill in all the information.
- Address: Give the correct address and make sure that you’re entering your current address so that you can receive the PIN from the Google AdSense team. If you have received any letters or couriers to your current address, check that and enter.

To update your Payee name and Address information follow the steps below.
- Click on the Gear icon on the right side top of the screen.
- From the drop-down menu, select payment.
- Select the payee profile which is present on the left side of the screen.
- Then click on the Edit option.
- Here, you can update your payment address and simply click on save.
In case, you missed knowing about Page level ads.
Personal Identification Number
- PIN: PIN is nothing but Personal Identification Number. To receive payments to your bank account, you need to verify your Google AdSense account. You will receive a PIN to the address mentioned in your Payee profile.
All you Need to Know About PIN Verification
To receive payments to a bank account, your account should be verified with the PIN which is received at the address you have given your payee profile.
- To receive a PIN, your Google AdSense account should generate a minimum of $10.
- Once it reaches $10, it is automatically enabled for PIN requests.
- It takes a minimum of 3-4 weeks to receive the PIN.
- Once you receive the PIN to your address which is given in the Payee profile, enter the PIN in your AdSense account.
- The PIN is received as a card labeled Google. For reference see the image below.


What If you don’t receive the PIN to your address?
If you don’t receive the PIN to your address, then you need not worry. Because we have 2 more possibilities to generate the PIN. Totally, we are allowed to request a PIN 3 times. If you don’t receive the PIN for the first time, then go to the payments section again and click on request PIN. You are allowed to request the PIN only after 2-3 weeks. Once you request the PIN for the 2nd time, only after 2-3 weeks of time you can request the 3rd PIN. So, on the whole, you can do this 3 times.
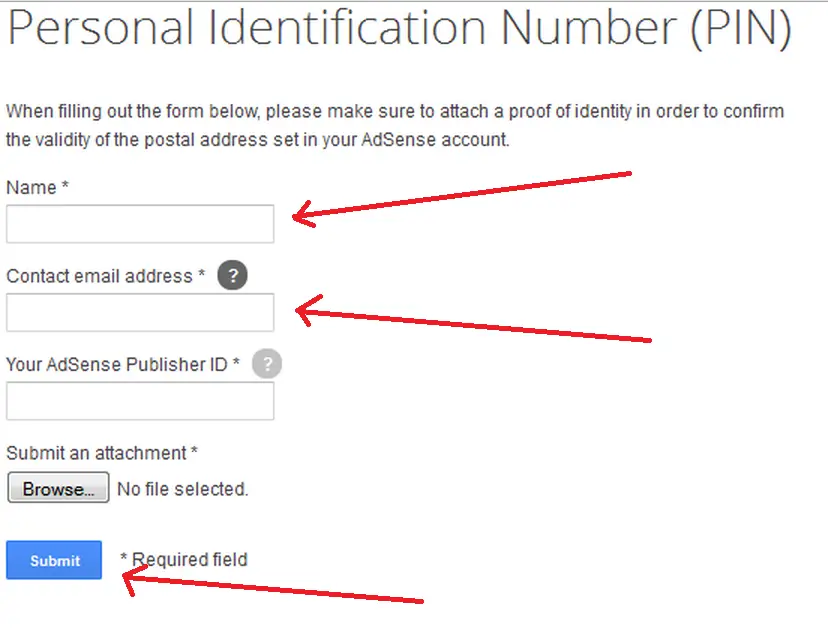
What If you don’t receive the PIN after 3 requests?
If you don’t receive a PIN even after 3 request attempts, you are enabled to fill out a form to submit your ID ( Identity proof) to verify your AdSense account. When you submit your Identity proof (Adhaar card, PAN card, Driving license, etc), your AdSense account gets verified within minutes.
Note: If you receive PIN for the first attempt, then your AdSense verification will be done with in a month. If you don’t receive PIN in 3 attempts, then it takes minimum 3 months to get verified. So, be careful while you update your Address information.
That’s all you are done with the second step and verify all the details you have entered in your profile.
Select the Mode of Payment
Here, you need to select the payment mode, through which you can receive payments. Depending on the payment address you will be able to select different forms of payment. There are totally six (6) modes of payment. They are as follows:
Note: Untill and unless your AdSense account is reached to minimum $10, you are unable to select the mode of the payment.

- EFT: Electronics Funds Transfer
- SEPA: Single Euro Payments Area
- Wire Transfer
- Checks
- Western Union Quick Cash
- Rapida
To update your payment information, just follow the instructions below:
- Click on the gear icon located on the right top side of the screen.
- Select the payments option.
- Then, you must select Payment Settings.
- Select Add new Payment method or choose the payment method based on your preference.
- Enter all the details precisely and then click save.

Note: It is suggestible to give the bank account details of the name which you have given in payee profile.
That’s it you are done. Check the details twice in a thorough manner before heading to the next step.
Threshold Payment
The final step is to meet your payment threshold. To receive payments to your bank account, the minimum threshold payment is $100. Until and unless you meet the threshold payment in your account, you are not supposed to receive the payments to your account.
Estimated time to receive AdSense payments to a bank account
- EFT (Electronic Fund Transfer: It takes up to 5 business days to receive the payments.
- Wire transfer: It takes up to 15 Business days.
- Checks: It takes up to 3 months to receive your payment.
- Western Union: It takes up to 15 business days to receive the quick cash.
- Rapida: It takes up to 15 business days to get the payment.
This is the minimum and maximum time to receive AdSense payments to bank accounts.
If you want to change your payment method or want to change your bank details from one account to another, then you must do it before 20th of that month. Because, payments will be initialised from 21 itself.
This is all about the Payment terms and conditions to be followed to receive Google AdSense payments to a bank account quickly. Hope this article clears all your doubts regarding the payments of Google Adsense to your bank account. If you still face any problems or if you have any doubts regarding payments, feel free to ask me questions in the below comments section.


