

A proxy or proxy server is basically another computer that serves as a hub through which internet requests are processed.
By connecting through one of these servers, your computer sends your requests to the proxy server which then processes your request and returns what you were wanting. In this way, it serves as an intermediary between your home machine and the rest of the computers on the internet.
Proxies are used for a number of reasons such as to filter web content, to go around restrictions such as parental blocks, to screen downloads and uploads, and to provide anonymity when surfing the internet. There are a number of proxies that can provide you with service. There are some proxies that are free and some which charge money, the choice is up to you but we have found that the paid proxies are more reliable, faster and more secure.
Generally, proxy settings are done in different Internet browsers such as Internet Explorer, Firefox, Google Chrome, Safari, etc. Many of us get a doubt that can we set these proxy settings in our smartphones. So, in this article, we shall discuss proxy settings in Android.
Android smartphones allow you to configure proxy settings for each Wi-Fi network. This is to require access to the Internet on a business or school network. Your browser traffic will be sent through the proxy you configure. Generally, the proxies we configure will be used by the web browsers, but may not be used by apps.
Each app developer can choose whether it uses Android’s proxy or not. That’s a good reason why you should use a VPN instead of a proxy. With a VPN, you can force all app’s network traffic through the VPN connection. It’s a better way to hide your IP address or access geo-blocked websites that aren’t available in your country.
Step 1
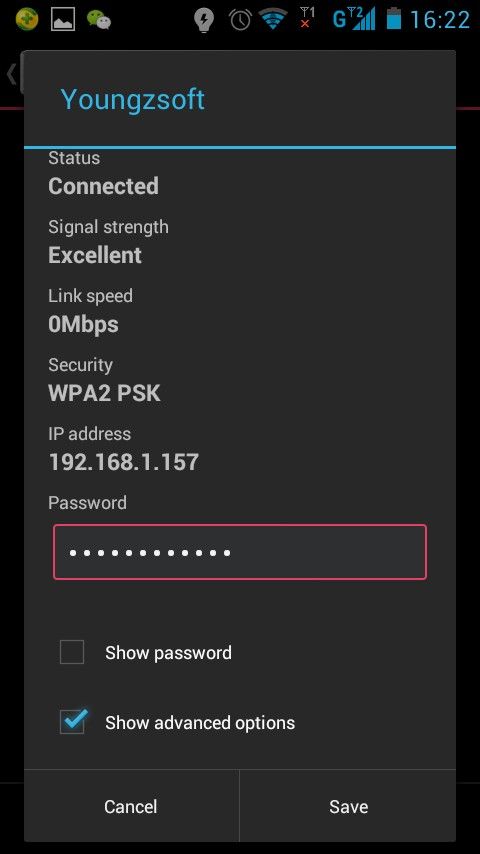
Open Settings app in your Android Smartphone. Tap on Wi-Fi and there appears a list of Wi-Fi networks.
Step 2
Long press on the Wi-Fi network that you want to change the proxy settings. Here, tap on ‘Modify Network’.


Step 3
This works only when you are connected to the network. If you haven’t connected to the Wi-Fi network, then you have to enter the password to get access to the ‘Modify Network’ option.

Step 4
Now expand the “Advanced options” section and tap on ‘Proxy’ tab. Select ‘None’ for no proxy, ‘Manual’ to manually enter proxy server settings, or ‘Proxy Auto-Config’ to automatically detect the appropriate settings for your network.
Step 5
Now click on ‘Proxy Auto-Config’ and Android will prompt you to enter the address of a proxy auto-configuration script (.PAC file).

Step 6
If your organization or proxy service provider needs a “.PAC file”, your network administrator or service provider will provide you with the address of the “.PAC file” you need to enter here.

Unlike other operating systems and web browsers, Android does not support the Web Proxy Autodiscovery Protocol or WPAD.
- If you enable “Proxy Auto-Config”, nothing will happen unless you provide the address of a “.PAC file” where Android can acquire the proxy settings.
- If you select “Manual”, you can manually enter the proxy server’s details. Enter the address of the proxy in the “Proxy hostname” box. Despite the name of the box, you can enter both hostnames like “proxy.example.com” and IP addresses like “192.168.*.***” here.
If you want to have Android bypass the proxy for any addresses, enter them in the “Bypass proxy for” box, separated by commas. For example, alltop9.com, example.com
Step 7
Tap “Save” to save your settings.
Note: Each Wi-Fi network has its own proxy server settings. Even after you enable a proxy server for one Wi-Fi network, other Wi-Fi networks will continue to not use a proxy server by default. Repeat this process if you need to change the proxy server settings for another Wi-Fi network.
If you face any issues while following the above method, let us know in the below comments. We will revert to you as soon as possible. We have also provided the best proxy sites list and mac proxy server settings. Check it out.
Which proxy server do you use?
___________________________________________________________________________
Some other articles you might find of interest:
What Gaming PC should you get for under $1,000?
The Top 18 Best Prebuilt Gaming PCs Under $1000 Revealed & Reviewed
Have you ever wondered what the internet of the future looks like?
Can you have two phones with the same number?
Your Quick Guide on How to Use the Same Mobile Number on Two Phones


